

 This week I wanted to share how you can work just a bit faster using BeerSmith 2 by managing your views, shortcuts and folders. BeerSmith has quite a few customizable tools for adjusting how you see your recipes as well as how you interact with the program itself.
So here are a few tips on how to manage all of the views in BeerSmith to get more out of your favorite brewing software.
Using Your Favorite Views
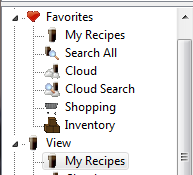 BeerSmith has a bunch of different tools and views, and most people seem to use the same views or tools over and over again. To help you get to your favorite tools quickly, the shortcut view on the left side has a “Favorites” list. If you right click on any of the tools under Favorites (or any of the other views below that) you can add or delete items from the Favorites list.
So for example if you often use the “Water Profile” tool to adjust your water, just go down to Tools->Water Profile in the shortcut pane shown to the right, then right-click on it and add that to your list of favorites.
Opening Recipes or Tools in a Separate Window
Quite often when working on the desktop, you don’t want the latest tool or recipe to open in a separate tab (which is the default). For example you might want to pop up the hydrometer tool to do a quick adjustment on a gravity reading without closing the recipe you are working on. Alternately you might want to open another recipe while still viewing the current recipe so you can do a side-by-side comparison of the two recipes. You can even open a recipe folder in its own window. This is particularly useful if you are working with a large monitor or have two monitors connected to your computer.
Fortunately opening any view in a separate window is pretty simple – just hold down the Shift key while opening the new view. So to bring up a tool, hold down the shift key and click on the tool. To open a recipe in its own window, hold down the shift key and double click on the recipe.
Customizing Columns and Column Size
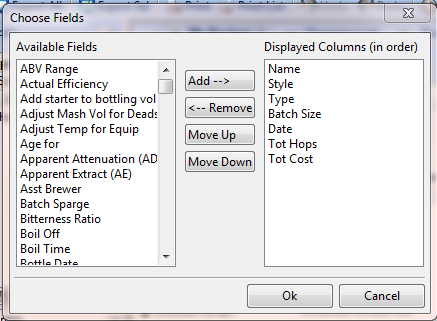 Did you ever want to show details like final gravity, total hops used or ABV for your list of recipes? In My Recipes view or any of the other “list” views you can customize the columns displayed for your list of recipes, ingredients or profiles. To do this, go to View->Customize Columns (or right click on the column header itself and select Customize Columns). This will display a dialog showing both the current columns displayed and other columns available.
From that dialog you can select new columns, remove columns or change the order of the existing columns. To add a column, select it from the list on the left and click Add. To remove one click on the column name on the right and click “Remove”. You can also change the order of columns displayed by selecting one and clicking Move Up or Move Down.
You can also adjust the size of columns in these views. Just drag the small line separating column headers at the top of any column right or left to adjust the width. You need to have your cursor over the line separating the header (column names) at the top of the view for this to work.
Changing the Ribbon, Preview and Shortcut Bars
By default the ribbon at the top of the screen shows large icons. You can change it to small icons to use less screen space if you click on View->Small/Large Ribbon. You can also toggle the “tabbed ribbon” which was the default in V2.0 of BeerSmith by going to View->Toggle Tabbed Ribbon. In some cases the tabbed ribbon can be a good alternative to the shortcut sidebar on the left of the screen if working from a small screen.
You can turn on/off the shortcut bars shown on the left of the screen if you have a very small screen size by going to View->Show/Hide Sidebar. You can also turn off the preview window pane shown below the list of recipes (or other items) by going to View->Close Preview or change its position with View->Preview Right or View->Preview Bottom.
Advanced Look and Feel Options – Confirmation of Changes, Tip Windows, More…
If you go to Tools->Options->Look and Feel (BeerSmith->Preferences->Look and Feel on the Mac) you can adjust advanced look/feel options. This includes the ability to adjust colors, turn the startup screen on/off and toggle the various tip windows that pop up when you hold the mouse over various fields and listings.
Also there is an option here to require that the program ask you to confirm before deleting items as well as one to confirm changes before closing a recipe (assuming it was not closed with the save or cancel button). These are options some users find useful to prevent accidental changes.
So those are some quick tips on how you can manage your views in BeerSmith desktop. Thanks for joining me on the BeerSmith Home Brewing Blog. You can grab a trial version of BeerSmith from BeerSmith.com. Be sure to sign up for my newsletter or my podcast (also on itunes…and youtube…and streaming radio station) for more great tips on homebrewing.
Related Beer Brewing Articles from BeerSmith:
- BeerSmith Web Inventory and Shopping List Features
- BeerSmith 2.2 Update for Desktop Quick Preview
- BeerSmith 2.2 Desktop Released
- Creating Custom Reports in BeerSmith Desktop
- BeerSmith 2.3 Update First Look – Release Date 8 August 2016
- BeerSmith for the Web Released
- Sharing and Rating Recipes in the BeerSmith Cloud
- BeerSmith 2.3 Update – New Features Detailed Overview
Don't make another bad batch of beer! Give BeerSmith a try - you'll brew your best beer ever.
Download a free 21 day trial of BeerSmith now

{ 0 comments… add one now }